


Awọn akoonu
Excel has a powerful, but at the same time very rarely used, ability to create automatic sequences of actions using macros. A macro is an ideal way out if you are dealing with the same type of task that is repeated many times. For example, data processing or document formatting according to a standardized template. In this case, you do not need knowledge of programming languages.
Are you already curious about what a macro is and how it works? Then boldly go ahead – then we will step by step do the whole process of creating a macro with you.
What is Macro?
A macro in Microsoft Office (yes, this functionality works the same in many applications of the Microsoft Office package) is a program code in a programming language Ipilẹ wiwo fun Awọn ohun elo (VBA) stored inside the document. To make it clearer, a Microsoft Office document can be compared to an HTML page, then a macro is an analogue of Javascript. What Javascript can do with HTML data in a web page is very similar to what a macro can do with data in a Microsoft Office document.
Macros can do just about anything you want in a document. Here are some of them (a very small part):
- Apply styles and formatting.
- Perform various operations with numeric and text data.
- Use external data sources (database files, text documents, etc.)
- Ṣẹda iwe tuntun kan.
- Do all of the above in any combination.
Creating a macro – a practical example
For example, let’s take the most common file CSV. This is a simple 10×20 table filled with numbers from 0 to 100 with headings for columns and rows. Our task is to turn this data set into a presentably formatted table and generate totals in each row.
As already mentioned, a macro is code written in the VBA programming language. But in Excel, you can create a program without writing a line of code, which we will do right now.
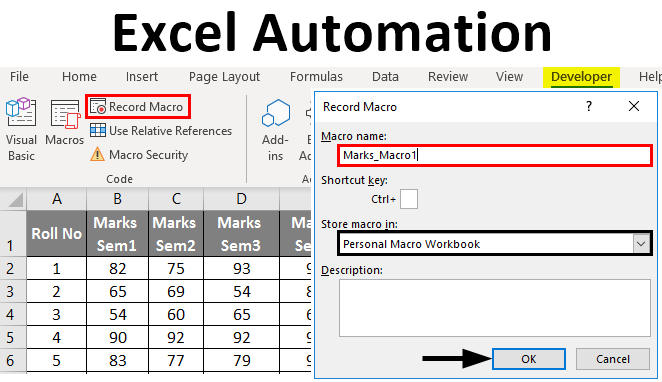
To create a macro, open Wo (Type) > Makiro (Macro) > Igbasilẹ Macro (Macro recording…)
Give your macro a name (no spaces) and click OK.
Starting from this moment, ALL your actions with the document are recorded: changes to cells, scrolling through the table, even resizing the window.
Excel signals that the macro recording mode is enabled in two places. First, on the menu Makiro (Macros) – instead of a string Igbasilẹ Macro (Recording a macro…) line appeared Da Gbigbasilẹ duro (Duro gbigbasilẹ).
Second, in the lower left corner of the Excel window. Icon Duro (small square) indicates that the macro recording mode is enabled. Clicking on it will stop recording. Conversely, when the recording mode is not enabled, there is an icon to enable macro recording in this location. Clicking on it will give the same result as turning on the recording through the menu.
Now that the macro recording mode is enabled, let’s get to our task. First of all, let’s add headers for the summary data.
Next, enter the formulas in the cells in accordance with the names of the headings (variants of the formulas for the English and versions of Excel are given, cell addresses are always Latin letters and numbers):
- =SUM(B2:K2) or =SUM(B2:K2)
- =AVERAGE(B2:K2) or =СРЗНАЧ(B2:K2)
- =MIN(B2:K2) or =MIN(B2:K2)
- =MAX(B2:K2) or =MAX(B2:K2)
- =MEDIAN(B2:K2) or =MEDIAN(B2:K2)
Now select the cells with formulas and copy them to all rows of our table by dragging the autofill handle.
After you complete this step, each row should have the corresponding totals.
Next, we will summarize the results for the entire table, for this we do a few more mathematical operations:
Respectively:
- =SUM(L2:L21) or =SUM(L2:L21)
- =AVERAGE(B2:K21) or =СРЗНАЧ(B2:K21) – to calculate this value, it is necessary to take exactly the initial data of the table. If you take the average of the averages for individual rows, the result will be different.
- =MIN(N2:N21) or =MIN(N2:N21)
- =MAX(O2:O21) or =MAX(O2:O21)
- =MEDIAN(B2:K21) or =MEDIAN(B2:K21) – we consider using the initial data of the table, for the reason indicated above.
Now that we are done with the calculations, let’s do some formatting. First, let’s set the same data display format for all cells. Select all cells on the sheet, to do this, use the keyboard shortcut Ctrl + Aor click on the icon Sa gbogbo re, which is located at the intersection of the row and column headings. Then click Comma Style (Delimited Format) tab Home (Ile).
Next, change the appearance of the column and row headers:
- Bold font style.
- Center alignment.
- Color fill.
And finally, let’s set up the format of the totals.
This is how it should look like in the end:
If everything suits you, stop recording the macro.
Congratulations! You just recorded your first macro in Excel yourself.
To use the generated macro, we need to save the Excel document in a format that supports macros. First, we need to delete all the data from the table we created, i.e. make it an empty template. The fact is that in the future, working with this template, we will import the most recent and relevant data into it.
To clear all cells from data, right-click on the icon Sa gbogbo re, which is located at the intersection of the row and column headings, and from the context menu, select pa (Parẹ).
Now our sheet is completely cleared of all data, while the macro remains recorded. We need to save the workbook as a macro-enabled Excel template that has the extension XLTM.
Ojuami pataki! If you save the file with the extension XLTX, then the macro will not work in it. By the way, you can save the workbook as an Excel 97-2003 template, which has the format XLT, it also supports macros.
When the template is saved, you can safely close Excel.
Running a Macro in Excel
Before revealing all the possibilities of the macro you created, I think it’s right to pay attention to a couple of important points regarding macros in general:
- Macros can be harmful.
- Read the previous paragraph again.
VBA code is very powerful. In particular, it can perform operations on files outside of the current document. For example, a macro can delete or modify any files in a folder Awọn iwe aṣẹ mi. For this reason, only run and allow macros from sources you trust.
To run our data-formatting macro, open the template file we created in the first part of this tutorial. If you have standard security settings, then when you open a file, a warning will appear above the table that macros are disabled, and a button to enable them. Since we made the template ourselves and we trust ourselves, we press the button Jeki Akoonu (Pẹlu akoonu).
The next step is to import the latest updated dataset from the file CSV (based on such a file, we created our macro).
When you import data from a CSV file, Excel may ask you to set up some settings in order to correctly transfer the data to the table.
When the import is finished, go to the menu Makiro (Macros) taabu Wo (View) and select a command Wo Macros (Macro).
In the dialog box that opens, we will see a line with the name of our macro FormatData. Select it and click Run (Ṣe).
When the macro starts running, you will see the table cursor jumping from cell to cell. After a few seconds, the same operations will be done with the data as when recording a macro. When everything is ready, the table should look the same as the original that we formatted by hand, only with different data in the cells.
Let’s look under the hood: How does a macro work?
As mentioned more than once, a macro is program code in a programming language. Ipilẹ wiwo fun Awọn ohun elo (VBA). When you turn on the macro recording mode, Excel actually records every action you make in the form of VBA instructions. Simply put, Excel writes the code for you.
To see this program code, you need in the menu Makiro (Macros) taabu Wo (wo) tẹ Wo Macros (Macros) and in the dialog box that opens, click Ṣatunkọ (Ayipada).
The window opens. Ipilẹ wiwo fun Awọn ohun elo, in which we will see the program code of the macro we recorded. Yes, you understood correctly, here you can change this code and even create a new macro. The actions that we performed with the table in this lesson can be recorded using automatic macro recording in Excel. But more complex macros, with finely tuned sequence and action logic, require manual programming.
Let’s add one more step to our task…
Imagine that our original data file data.csv is created automatically by some process and is always stored on disk in the same place. For example, C:Datadata.csv – path to the file with updated data. The process of opening this file and importing data from it can also be recorded in a macro:
- Open the template file where we saved the macro − FormatData.
- Create a new macro named LoadData.
- While recording a macro LoadData import data from file data.csv – as we did in the previous part of the lesson.
- When the import is complete, stop recording the macro.
- Delete all data from cells.
- Save the file as a macro-enabled Excel template (XLTM extension).
Thus, by running this template, you get access to two macros – one loads the data, the other formats them.
If you want to get into programming, you can combine the actions of these two macros into one – simply by copying the code from LoadData to the beginning of the code FormatData.