


Awọn akoonu
If you want your underfloor heating to work at its best, then installing a thermostat is a necessary step. Installation can be entrusted to professionals, or you can do it yourself with little skills and abilities. But even if you decide to entrust this matter to a specialist, it would be nice to know what the process looks like – just in case, as they say, trust, but verify. Tips from KP and expert Konstantin Livanov, who has been engaged in repair work for 30 years, will help you figure out how to connect the thermostat to a warm floor in a quality manner.
Bii o ṣe le sopọ thermostat si ilẹ ti o gbona
What is a thermostat
A device such as a thermostat, or, as it is also called, a thermostat, is needed for the operation of a warm floor (and not only). It allows you to control the on / off of the system and fix the temperature regime for a certain period of time. And the most advanced modern systems are able to maintain and change the microclimate in the house and remotely, via the Network. An example of such a device is Teplolux EcoSmart 25, which can remotely control the temperature of underfloor heating. To do this, you need to install the application SST awọsanma on any iOS and Android device. Changes in operating modes of the EcoSmart 25 thermostat can be controlled from anywhere in the world if there is Internet in the house.
The design of the two thermostats of the Smart 25 series was developed by the creative agency Ideation. The project received the prestigious European Product Design Awards1. It is awarded in cooperation with the European Parliament to innovative products designed to improve the daily lives of consumers. A striking difference in the design of the Smart 25 line is the 3D relief pattern on the frames and surfaces of the analog instrument. Its dial has been replaced by a soft-switch rotary switch with light indication. This design makes operating underfloor heating intuitive and more enjoyable.
Step-by-step instructions for connecting a thermostat to a warm floor
Choosing a place for installation
To install, you first need to determine where we will put the thermostat. Most modern appliances are designed for a standard wall box with a diameter of 65 mm. They are installed in the socket frame or placed separately – this is not so important for installation. It is desirable to power the thermostat from the electrical panel using an automatic protective shutdown system. But it is also possible to use the connection to the outlet (AC mains 220 V, 50 Hz).
The location of the temperature sensors is critical to the correct operation of the thermostat. If your model has a remote air temperature sensor, you need to install it at a height of at least 1,5 m from the surface of the heated floor, and generally away from heat sources (for example, windows or radiators). And it is better to choose models with an air temperature sensor built into the device itself – there is less trouble with them, you can immediately install the thermostat in the right place. This option is implemented in Teplolux EcoSmart 25.
The Teplolux EcoSmart 25 has a built-in air temperature sensor, so that the thermostat can be immediately installed in the right place. Any thermostat for underfloor heating has a remote sensor that must be installed next to the heating element. But consider how long the sensor wire is. It is better that it be at least two meters.
In the same Teplolux EcoSmart 25, due to the presence of an air temperature sensor, a function called “Open Window” works. If the room temperature suddenly drops by 3 degrees within five minutes, the device considers that the window is open and turns off the heating for 30 minutes.
Iṣẹ igbaradi
Of course, before installing the thermostat, it will not be superfluous to study the instructions that any self-respecting manufacturer puts in the box with the device. This is also why experts recommend choosing certified devices from trusted companies, and not chasing cheap analogues from China. So, all thermostats from the Teplolux company are supplied with detailed instructions in .
Before installation, prepare the following things:
- Corrugated mounting tube. Usually it comes with a warm floor, but anything can happen. Universal diameter – 16 mm. But to determine the length, you need to measure the distance between the installation site of the device and the temperature sensor.
- Regular screwdriver.
- indicator screwdriver. It is useful in order to find out what voltage is in the mains.
- Awọn fasteners.
- Ipele ipele.
- Mounting box and frame for light switches
Finally, we make a hole for installing the device and grooves in the wall and floor, which are needed for laying power cables and remote temperature sensors.
In the box with devices from the company “Teplolux” there is always a detailed installation manual in
Apẹrẹ asopọ asopọ Itanna
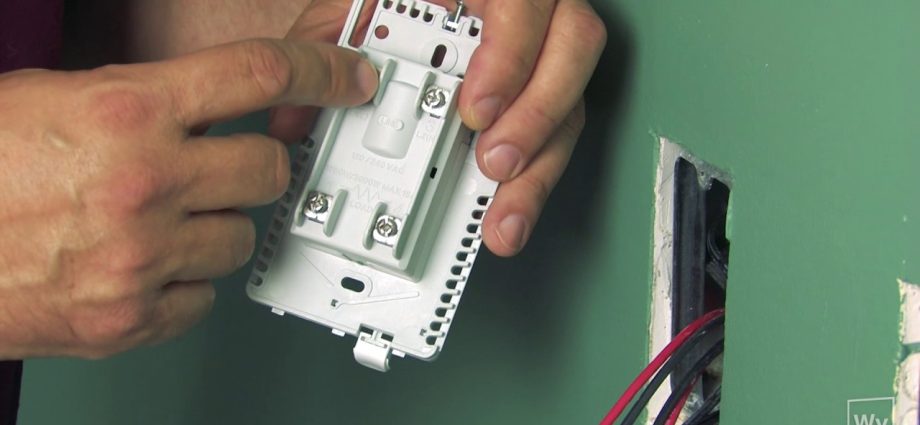
So, we are all ready to connect. We bring wires into the junction box: a blue wire goes to “zero”, the phase is connected to a black wire, grounding is connected to a wire in yellow-green insulation. Do not forget to measure the voltage level created between “zero” and phase – it should be 220 V.
Next, we’re going to cut the wires. This must be done in such a way that they protrude from the box by about 5 cm. Of course, the wires must be stripped.
After stripping, we connect the power wire to the installed thermostat. The scheme is always in the instructions and is duplicated on the instrument case. We throw the phase wire at the desired contact, it is marked with the letter L. “Zero” is denoted by the letter N.
Now we need to connect the temperature sensor to the terminals on the device. We recall that it must be laid in a corrugated pipe.
To test the thermostat, you need to set the maximum temperature on it. The click of the relay will let you know that the heating circuit is closed. That’s it, if the underfloor heating and the thermostat are connected correctly, then you get a working system.
Gbajumo ibeere ati idahun
– It is possible, but the connection to the thermostat for underfloor heating and the sensor in any case will have to be mounted. Look towards built-in models, such as the Teplolux MCS 350. This thermostat can be neatly installed where it suits you, and the large touch screen, advanced programming mode and remote control using the SST Cloud mobile application will definitely come in handy.
The rules for safely connecting a thermostat to a warm floor are quite simple:
– De-energize the entire house and apartment before connecting. This is the most correct option, but if this is not possible, then at least disconnect the dedicated line to the thermostat from the network.
– Do not turn on the mains until the thermostat is fully assembled.
– Of course, devices are most often installed in conditions of dirty repairs, but before installing and turning on, clean both the place and the device.
– Do not clean the thermostat with aggressive chemicals.
– Never allow work with exceeding the power and current values that are higher than those indicated in the instructions for the device.
Finally, if you are not completely confident in your abilities, then it is better to entrust the installation of a thermostat for a warm floor to a specialist.